Sealing & Packing Preparation
How to Seal Mylar Weed Bags: A Guide for Cannabis Brands
To heat seal a cannabis Mylar pouch, identify its intended filling opening and seal zone, keep that area clean and flat, and use equipment suited to the actual film construction. Follow the material guidance and the sealer's operating instructions, complete the required heating and cooling cycle, then review representative samples before beginning the packing run. A reclosable zipper and the final heat seal perform different jobs.
In This ArticleThe useful starting point is a defined pouch and a defined machine. “Mylar,” a color, or a thickness description alone does not establish the correct temperature, time or pressure. For your packaging, agree the layout and trial requirements with the pouch supplier and the team that will fill and seal it.
Understand the Zipper, Factory Seams and Final Heat Seal
A premade pouch arrives with part of its structure already formed. Depending on the format, its side seals, base and closure have been incorporated during manufacturing, while the intended filling end remains accessible. The packing team loads the contents and completes the final closure specified for that package.
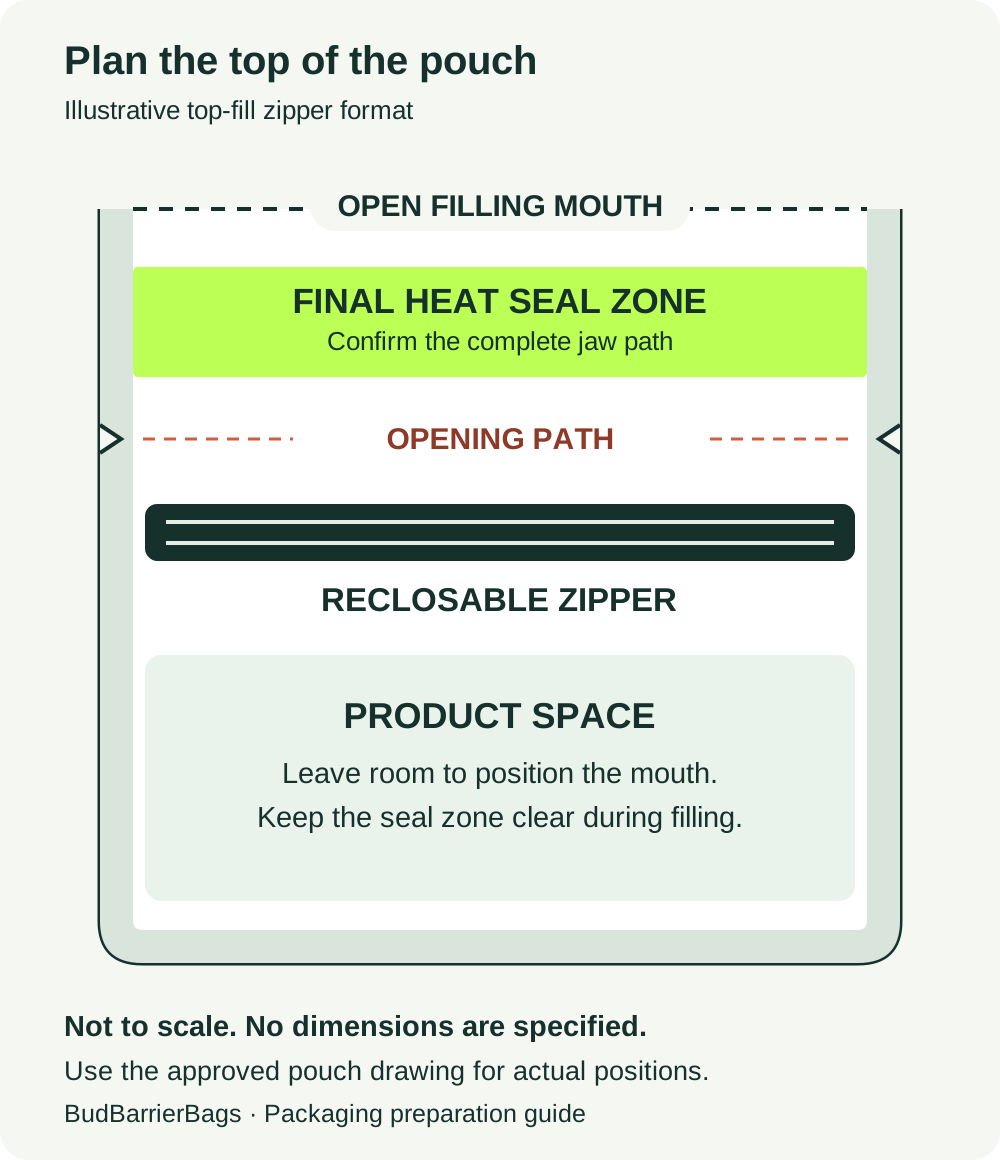
A zipper joins two profiles so the pack can be opened and reclosed. A heat seal joins the designated film surfaces along a defined path. On a suitable top-fill zipper pouch, the final seal is commonly positioned above the zipper, allowing the customer to remove the sealed header before using the zipper. Confirm that arrangement on the actual pouch drawing.
| Part of the package | Job to consider | What your team should confirm |
|---|---|---|
| Factory-made seams | Form the pouch structure before filling | Which seams are already made and which end is left for filling |
| Reclosable zipper | Allow the intended opening and reclosing sequence | Closure type, operating instructions and clear access |
| Final heat seal | Close the designated opening after filling | Seal path, available area and compatible sealing setup |
| Tear features or hanging hole | Support opening or retail display | Their positions relative to the zipper and continuous seal path |
Keep these functions separate in the brief. Closing a zipper does not complete a separate heat-seal step. Likewise, adding a heat seal does not establish every other performance requirement for the finished package. Describe any additional closure or market requirements for the exact configuration you plan to buy.
If you are still choosing the package, our Mylar materials and pouch formats guide explains how shape, film construction, closure and finish fit together. This guide focuses on preparing that chosen pouch for the packing operation.
Map the Actual Filling End and Seal Zone
Start with the current pouch drawing and a physical sample. Identify the open end, the two surfaces intended to seal together, the proposed jaw position and the complete path across the opening. Check the front and back rather than relying on a front-panel photograph alone.
The illustration below shows the relationship between features on a generic top-fill zipper pouch. Your agreed drawing determines their actual positions and dimensions.
Keep a Continuous Path Across the Opening
Check that the intended sealing jaws can reach the full path without crossing the zipper profile or another feature that was not designed into that sealing operation. Review the ends of the seal as carefully as its center. Side seams, folds and changes in the number of film layers deserve attention during the trial.
A hanging hole also needs a defined relationship to the seal. Review where the hole sits and how the proposed seal closes the product compartment. Avoid moving the jaw to a convenient position without reviewing the complete layout. If the available header does not suit the equipment, discuss the pouch specification before ordering the run.
Check What Remains After Opening
Review how the customer removes the sealed header and reaches the zipper. The opening path should suit the agreed structure and leave the intended closure usable. Position essential wording and codes with that opening sequence in mind, including any information printed on the removable section.
Use the artwork and print-ready file checklist to coordinate those areas before the design is approved. A late change to zipper height or the final seal zone may also require the artwork to be reviewed.
For custom Mylar bags, send a marked sample photo or drawing with your proposed sealing position. Show the full mouth, both edges and any feature near the jaws. That gives the packaging and equipment teams a clearer question than asking whether a bag is simply heat sealable.
Match the Pouch Construction to the Sealer
Ask for the material reference and sealing guidance for the proposed pouch. The product-contact sealant and the overall laminate both matter to the discussion. A metallic appearance or matte surface does not identify the full construction, and two visually similar pouches should not automatically receive the same setup.
ASTM F2029 addresses laboratory heat-seal preparation and explains that construction and thickness affect sealability. It also distinguishes laboratory results from production equipment: laboratory data provides a starting point for developing production conditions, rather than replacing the necessary work on the actual machine.
Understand What the Machine Controls
An impulse sealer applies an energy pulse followed by cooling; a constant-heat sealer maintains heated sealing surfaces. Sealer Sales' equipment primer describes these operating differences. Choose a specific model around the pouch and process, including its usable sealing length, jaw arrangement, controls and handling requirements.
Read the units and meaning of each setting. An adjustable dial might represent a machine-specific heat setting or cycle control rather than a measured temperature. Record it as the machine presents it. If a parameter is not displayed or independently adjustable, ask the equipment supplier how it is controlled; do not create a value for the record.
Review Heating, Contact and Cooling Together
Temperature, heating duration or dwell, and contact pressure belong to the same sealing setup. Follow the definitions in the equipment instructions. A setting that changes the result on one machine may not have an equivalent meaning on another model.
Cooling also forms part of the cycle. TOSS explains controlled impulse sealing, including cooling under pressure. Follow the specified cooling and release sequence for your machine before moving or loading the fresh seal. Avoid shortening that sequence merely because the heating indicator has turned off.
Our white printed flat zipper pouches provide a useful structure reference for discussing an uninterrupted upper panel and the closure below it. For your version, agree the header layout and actual sealing construction together, then supply the sample to the equipment team.
Confirm Compatibility Before Buying the Machine
If equipment is still being selected, send the machine supplier the proposed pouch construction, full mouth width, intended seal path and representative samples. Explain how the pouch will be supported and presented to the jaws, along with your intended working pattern.
Ask what trial, accessories and operating guidance the machine supplier needs to confirm suitability. Keep the material recommendation tied to its stated conditions. A broad claim that a sealer handles Mylar does not settle the details of your printed laminate, closure and filling arrangement.
Prepare the Packing Area and Representative Samples
Plan the trial around the pouch and contents that will actually be used. Identify the candidate sample, material reference, structure revision and intended fill. Separate preliminary format samples from samples representing the proposed production configuration, so everyone understands which questions each can answer.
Our factory work covers manufacturing the flexible pouch. The brand or its packing partner then needs a suitable procedure for the final filling and sealing operation. Discuss those responsibilities early: who supplies the sample, who operates the sealer, who reviews the results and who decides whether the setup can be used.
Leave Working Room Around the Contents
Check whether the intended fill allows the pouch mouth to sit correctly in the machine. The operator should be able to present the seal zone without forcing the contents into the closure or pulling a loaded pouch into an awkward position. Support the body as required by the equipment instructions.
For flower, consider the space occupied by representative contents and the handling the product should tolerate. For gummies, consider piece dimensions, count, settling and any tendency to contact the upper surfaces during loading. For pre-rolls, include overall length, maximum diameter, count and orientation. These are packaging inputs, not universal capacity rules.
Use the cannabis pouch size guide if loading or closure clearance is still unresolved. Choose the allowance around the actual product and process. A fixed amount of headspace borrowed from another bag can leave the important sealing questions unanswered.
Keep the Intended Seal Surfaces Clear
Before sealing, inspect the designated area for product particles, residue, moisture and folds. Review how the filling method keeps contents away from that area. If contamination repeatedly reaches the mouth, address the loading arrangement or usable space instead of treating it solely as a temperature problem.
Use the cleaning method approved for the equipment and packaging operation. Keep the jaws, protective surfaces and supports in the condition specified by the machine supplier. Operators should follow the machine's safety, isolation and maintenance instructions when inspecting or servicing it.
Prepare a place for identified trial samples to cool, be examined and remain separate from accepted stock. Have the record sheet ready before starting. This helps preserve the link between a sample, its settings and the observations made on it.
Run a Controlled Sealing Trial
Agree the trial and its acceptance criteria with the responsible packaging and equipment teams. The following sequence helps organize the work; the actual settings, sampling and release decision belong to the defined pouch, machine and packing process.
1. Identify the Setup and Starting Conditions
Record the machine model, pouch and material references, jaw arrangement and applicable operating instructions. Confirm any required setup checks and the starting conditions recommended for that combination. Identify the person making adjustments and the person responsible for reviewing the samples.
An empty-pouch check can help review positioning and operation. Include representative filled samples when assessing how the package is actually presented and handled. Keep the two sample groups identified, since an empty flat mouth does not reproduce every condition of the filled pack.
2. Load and Position the Pouch Consistently
Fill using the intended product amount and arrangement. Operate the zipper according to the agreed packing sequence, where fitted, and keep its profile outside the final sealing path unless the structure and process specifically provide otherwise. Recheck that the seal surfaces are clear.
Place the mouth according to the equipment instructions. Look at both edges, not only the printed center panel. Confirm the full path is engaged and that the pouch body is supported without pulling the film sideways. Keep the positioning method consistent between comparable samples.
3. Complete the Specified Cycle
Use the recommended heating, contact and cooling sequence. Allow for the release and handling instructions that apply to the machine. Keep the fresh seal supported as required, and avoid turning the trial into a speed contest before its conditions have been reviewed.
If the operation involves several people, observe the handoff between filling, sealing and collecting samples. Record differences in how the mouth is presented or how quickly a pouch is moved. A written machine setting is useful only alongside an operation the team can reproduce.
4. Label Samples Before Changing Conditions
Give each sample or sample group a reference that connects it to the settings and observations. Record the planned change before making it. Where appropriate, change one controllable variable at a time so the result remains interpretable, while following the limits and trial approach agreed with the technical team.
If the jaws are cleaned, an element or protective surface is replaced, or the pouch positioning changes, record that intervention too. Otherwise, a different result may be attributed to the dial setting even though another part of the setup changed at the same time.
5. Review Repeated Operation and the Restart
Include the working pattern your packing team expects to use. Ask the equipment supplier which startup, repeated-cycle and restart conditions should be assessed. Keep samples from the relevant stages identified rather than combining them into one untraceable pile.
Review the filled pouch after the agreed cooling and handling period. Confirm that the closure remains usable, the body can be handled as intended, and the final pack can enter the next packaging stage. Use the observations to decide what should be adjusted or checked next.
6. Agree the Result and Any Limits
Keep the approved setup connected to the exact configuration assessed. If the review identifies unresolved seal or handling concerns, separate the affected samples and arrange the next checks. A promising first sample can support the next trial; it does not by itself establish an operating range for every future run.
Once the appropriate team approves the setup, document what triggers another review. Relevant changes can include the pouch construction, film thickness, closure layout, machine, sealing parts or product presentation. Keep the earlier record as a reference while identifying the new configuration clearly.
Inspect the Samples and Choose the Right Follow-Up
Examine the full seal path and surrounding material after the specified cooling period. Look at the center, ends and transitions near existing seams. Check for trapped product, pronounced folds, missed areas, distortion and interference with the zipper or intended opening. Keep useful close photographs alongside a view of the whole pouch.
Treat observations as information for a decision. Describe what you see before assigning a cause. For example, a fold crossing the seal gives the team a specific location to investigate; a note saying “bad seal” leaves the next person guessing which part of the package needs attention.
| Observation on a trial sample | Immediate review | Information to keep |
|---|---|---|
| A fold crosses the intended seal path | Separate the sample and review presentation, support and feature positions | Full-pouch view, close view and position along the jaws |
| Product or residue is present in the seal area | Review filling and seal-area preparation before continuing | Product condition, loading sequence and affected area |
| Film is distorted, sticks or shows an uneven result | Follow the equipment guidance and review the recorded cycle with the technical team | Settings, cooling sequence and condition of the sealing surfaces |
| One end appears different from the center | Review the complete jaw path and the pouch construction at that location | Edge and center views, orientation and sample reference |
| The seal looks consistent but performance remains uncertain | Arrange evaluation suited to the package and the question | Proposed method, acceptance criteria and identified samples |
These are starting observations, not a diagnosis chart. Do not keep applying extra heat to uncertain samples and treat the next appearance as proof of acceptance. Record any further treatment and let the agreed review determine what happens to the affected packaging.
Separate Appearance, Strength and Integrity
A visual review, a seal-strength measurement and an integrity assessment answer different questions. ASTM F88/F88M measures the force needed to separate a specimen containing a seal and records how the specimen fails. Agree the method and criteria for your application rather than inventing a passing force from a hand pull.
ASTM F1886/F1886M covers visual inspection of packaging seals and material surfaces. Its seal-inspection section requires at least one transparent side for viewing the seal area; its material-surface section also addresses opaque surfaces. Choose a method appropriate to what can actually be examined on your pouch. Suspect observations may require further testing to establish whether integrity is compromised.
For a printed opaque pouch, plan the evaluation before relying on appearance alone. Tell the testing team the material, complete package configuration and intended question. Ask which samples and preparation are needed, how the result will be reported and what acceptance criteria apply. Equipment used to prepare a seal and equipment used to measure its strength have distinct roles.
Keep the review proportionate to the decision. An initial positioning trial can help identify a layout problem. Approval for a packing run needs the checks agreed for that operation. If your intended claim concerns leakage, product protection or another package property, specify the relevant evaluation separately from a basic visual review.
Keep a Reusable Trial Record
A good record allows another person to identify what was sealed, how it was handled and which result was accepted. Store the settings beside the sample references and photographs. A machine photograph can supplement the record, but the readable values, units and configuration should also be written down.
Use a separate entry when the material, structure or setup changes. Mark machine controls exactly as displayed, distinguishing a temperature value from a numbered dial setting. Where a parameter is fixed by the equipment, identify that fact and the applicable instruction instead of adding a made-up number.
| Record field | What to enter for your trial |
|---|---|
| Pouch identity | Supplier reference, format, material reference, structure revision and batch identification where available |
| Upper layout | Filling end, zipper, seal path and nearby features, supported by the current drawing |
| Trial contents | Product description, intended weight or count, arrangement and relevant variation |
| Machine and parts | Make, model, machine identification, jaw arrangement and relevant sealing parts |
| Controls | Actual settings and units, including heating, time, pressure and cooling controls where provided |
| Operating sequence | Setup checks, positioning, support, cycle and handling after release |
| Sample references | Which samples represent each condition, including empty and filled groups |
| Observations | Seal appearance, feature operation, handling and any interventions during the trial |
| Additional evaluation | Agreed methods, sample preparation, criteria and the associated results |
| Decision | Reviewer, approval scope, unresolved actions and changes requiring another review |
The table is a planning template for your own work. Complete it with the actual setup and observations rather than treating the example fields as a test result. Keep approved records accessible to the packing team, including the correct revision when an instruction changes.
Our printed gummy pouch series illustrates why product variants need clear identification. Shared branding helps a range look coordinated, while the packing record still needs to identify the product, intended count and pouch configuration being assessed. If variants share one proposed setup, state which representative combinations were reviewed.
Where the project includes matching pouches and boxes, review the closed pouch in its intended arrangement after the relevant sealing and handling steps. Include insertion, removal and the space around the header. BudBarrierBags manufactures the flexible bags and coordinates matching box supply; confirm the filled-pouch fit before finalizing the box specification.
Send Us a Clear Sealing and Packaging Brief
You can begin with a reference bag, a machine model and a description of the packing task. State what is already decided and where you need help. We can discuss the pouch structure and layout alongside the information your packing or equipment team provides.
Include the following where available:
- Product type, intended weight or count, and how the contents will be arranged.
- Preferred pouch format, measured dimensions with units, and any matching-box requirement.
- Material or sample reference, zipper type, filling end and proposed seal path.
- Equipment make and model, relevant instructions and photographs of the pouch position.
- Current trial settings, sample references and specific observations, if trials have begun.
- Design direction or existing artwork, quantity per design and delivery destination.
You do not need a complete design to start the conversation. Our packaging design service includes free creative design and free layered print-ready files. Once the structure and feature positions are agreed, the artwork can be prepared around the appropriate print and opening areas. File arrangements and project details are confirmed for your order.
Use the inquiry form below, or start your packaging project on the dedicated quote page, including details that are still undecided. For sample photographs, drawings and equipment information, contact info@dlboxmaker.com through the existing email route. A clear brief gives the pouch supplier, equipment supplier and packing team the same configuration to discuss.
Questions Buyers Ask
Can a Household Iron or Hair Straightener Replace a Packing Sealer?
For a commercial packing operation, select equipment with controls, a sealing path and operating instructions suited to the actual pouch. A household appliance setting does not establish a documented process for your laminate. Discuss representative samples with the equipment supplier before choosing a machine.
Do Heat Sealing, Vacuum and Oxygen Absorbers Mean the Same Thing?
They are separate process choices. Closing a pouch with a heat seal does not by itself mean that air has been removed or that an absorber is needed. Discuss any atmosphere-control requirement around the product and complete package instead of adding a step simply because a generic storage guide includes it.
What If a Co-Packer Will Fill and Seal the Bags?
Bring the co-packer into the structure discussion before the pouch specification is approved. Share the machine, filling arrangement, sample needs and responsibilities for trial review. Keep the approved pouch reference and current instructions available to everyone involved in the handoff.
Can Different Printed Designs Use the Same Sealing Setup?
Compare the actual constructions and layouts first. A color change alone does not tell you whether the laminate, thickness, closure or finish is unchanged. Ask which differences need review, and document the scope of any setup intended to cover several variants.
Sources & Further Reading
General technical references for this article. Confirm the specification and print instructions for your own project.
- ASTM F2029-16(2021): Laboratory heat-seal preparation
Scope and limitations of laboratory preparation and its relationship to production conditions.
- ASTM F88/F88M-23: Seal strength of flexible barrier materials
Scope of a quantified seal-strength measurement.
- ASTM F1886/F1886M-25: Visual inspection of primary packaging
Distinct inspection scopes for seals and material surfaces.
- TOSS: Process Control Improves Heat Seal Quality
Process-control background, including cooling in controlled impulse sealing.
- Sealer Sales: A Quick Primer on Heat Sealers
General equipment functions; select and trial the specific model for the intended pouch.